
This is the resource page for the WFH Workshop held on Sunday, March 29, 2p-3p ET on Zoom.
If you’ve recently added “video conference producer” to your job description, I have a few tips and techniques that will help you take your WFH video studio to the next level. We’ll have a look at cameras, lights, microphones, backgrounds, and some tricks of the trade that will help you get the most out of the equipment you already have.
Before we get started, I want to make one thing perfectly clear. Today, and for the foreseeable future, the people who are interested in connecting with you will not care about production quality. It is also important to note that authentic production values often beat slick production values. That said, it is not always appropriate to use your smartphone in selfie mode to chat with your team. So let’s review.
Making It Easy
The most important attribute of any video conferencing environment is ease of use. It needs to be as easy as pressing a button (which it can be). You also need to have confidence that when you press that button, your system is going to work. So the simpler, the better.
The World’s Simplest Setups

Your smartphone is a video studio, and so is your laptop. Right out of the box. Go stand facing a window (during the day) and point your phone or your laptop at your face. Answer the video call and start conferencing. If you want to take it up a notch, wear wired earphones (that have a microphone, of course). Next level up: wear wireless earbuds. It doesn’t get simpler than this. It will work as long as you have broadband connectivity – which means it will basically always work.
Webcam vs. External Video Camera
The webcam in your laptop and your rear-facing smartphone camera have a relatively wide-angle lens. In general, these are low-resolution cameras (fuzzy-ish images). You will notice that your webcam doesn’t capture all the colors your smartphone camera captures (even with relatively good lighting). This is because webcams are built for low-resolution video chatting. If you’re just going to do a series of video chats and you have limited bandwidth at home, your webcam or smartphone rear-facing camera is probably well suited to the task.
However, if you want to look great, consider an external camera. If you have an old handheld video camera (Handicam) with an HDMI output in the closet, you’re in luck. You will also need a video capture device, a tripod, or some kind of shelf or clamp to get it right over your monitor.
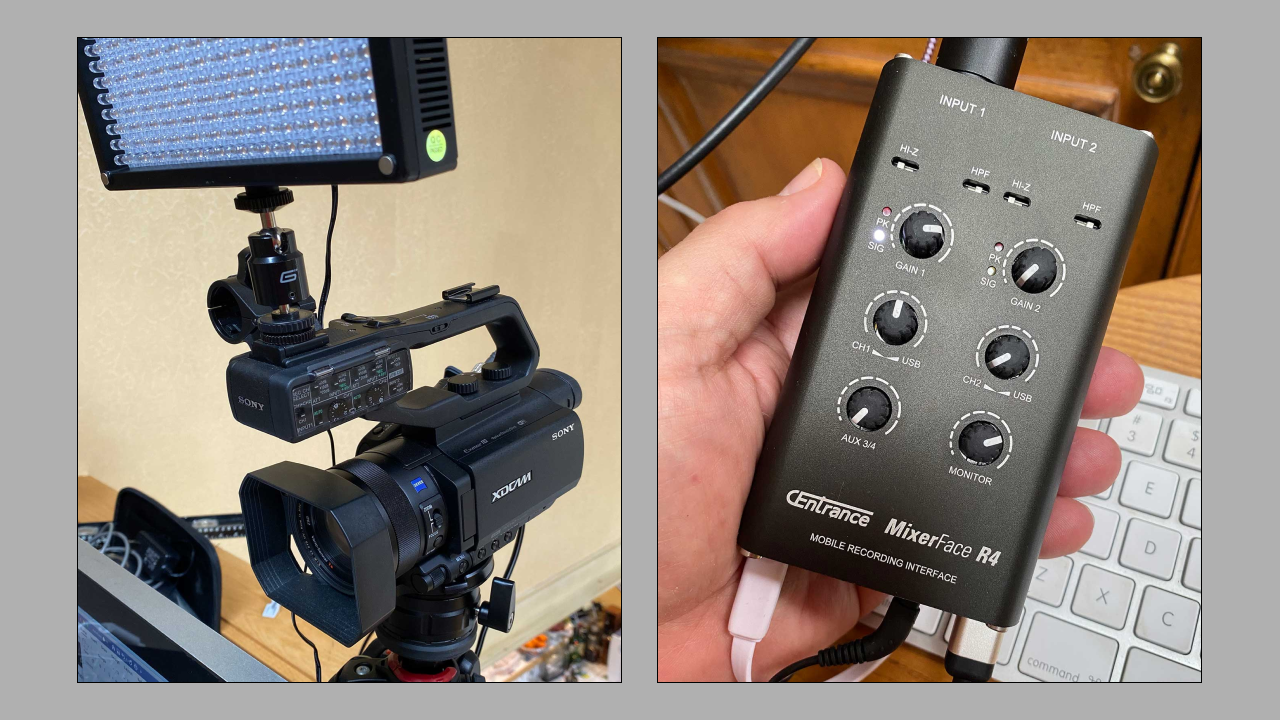
Here’s my temporary rig in VT. It’s a Sony 4K PWX-X70 camera with an SDI output. Its output goes to the input of a Blackmagic Design UltraStudio Mini Recorder, which outputs (via Thunderbolt 2) to a Thunderbolt 3 to USB-C dongle, which outputs to my MacBook Pro.
The MacBook’s MacOS sees the Mini Recorder as a camera, so it becomes a selectable option for all audio and video software.
Audio
If you decide to use an external camera, you may have the option to use an external microphone as well. In my case (Sony PWX-X70) the camera can handle two professional microphones. The audio would then be incorporated into the camera’s SDI or HDMI output. I do not do this.
I use a separate audio system to give me additional flexibility. In my case, I use a CEntrance MixerFace R4 audio input device with various microphones for various purposes. I’m not recommending this for the “keep it simple” crowd. But it is required if you really want control of your audio.

For video – I use a wired Sennheiser lavalier (“lav,” or “lapel mic”) similar to the microphones I use on television. You can find them on Amazon or at B&H Photo. (You don’t need to spend a fortune on this; $40-$60 is fine.) Be sure (check twice) that your camera or audio input device or computer or smartphone is compatible with the microphone you purchase. This has everything to do with the connecting cables and the required power for the mic. There is a remarkable variety of microphones and potential connections, so just ask about the options. Then, ask again. Be sure that the mic you purchase will work with your setup.
For audio (podcasting) – I use an Electro-Voice RE20. There are many far less expensive choices. The only reason I’m bringing this up is that you will need an external audio interface only if you are going to use a variety of microphones. If you’re setting up a video conferencing studio for yourself, you can just use a lavalier mic with your video camera and call it a day.
Camera Position

Where you put the camera matters. If you are going to use your monitor as a teleprompter (with or without special software), you want the camera lens right at the top of your monitor. If you position the external camera lens right over your webcam, you’re probably good. Importantly, you will be looking up at the lens. That is exactly what you want to be doing. You will look better if you are looking slightly up (no one wants to look up your nose when you’re speaking to them on camera).
Lights
If your desk looks out the window, you already have the best lighting possible, especially on cloudy days or at sunrise or sunset (depending upon which way your window is facing). If not, my lighting hack is to mount a light in the accessory shoe on top of the video camera – just one pointing right at me.

There are a few good reasons for this. (Even if you share my hairstyle.) First, there will be no shadow visible to the camera. It will either fall on the floor or fall behind you (assuming you are not sitting too close to a wall). This is a giant plus. Second, your face will be illuminated to the point where people watching can actually see you.
If you are using a green screen, a single light source directly in front and slightly above you (right on top of the camera) is the quickest, most foolproof way (assuming that your shadow does fall on the floor and not on the green screen) to guarantee your software will be able to cut a usable key (properly separate you from the background so you can be superimposed on the virtual background of your choice).
If you have time, money, and space, consider a key light, fill light, and back light. Just Google this classic lighting technique. It is the “best practices” – but only if you have time, money, space, and quiet air conditioning! Don’t do this unless you really want to get into serious daily video production. It’s a money pit.
Background and Costumes
The aforementioned green screen is easy to purchase. You can even get some “Ultamatte Green” or “Chromakey Blue” paint and paint the wall behind you. It is not necessary. Do your best to create the illusion of depth. Try not to have columns or molding coming out of the top of your head. The illusion of depth goes for you, too. If you can wear layers, you will look way better than you will in just a t-shirt. Also, avoid pure white clothing or herringbone patterns. White flares and herringbone tears.
Headsets

You’ve got three ways to go with headsets. Earbuds with a built-in microphone, an over-the-ear videogame headset with a built-in microphone, or separate over-the-ear headphones with a separate microphone. This is a personal preference. The videogame headsets with built-in mics are great for WFH webcam setups. They give you privacy and good audio and let you walk around the house. They come in USB or Bluetooth or 3.5mm jack versions. Just be sure that your computer or smartphone is compatible (cable-wise) with the headset you purchase.
PowerPoint vs. PDF
Many people will suggest that, for simplicity’s sake, you export your PowerPoint presentations to PDFs for online presentation. Simplicity is always a good idea. But if you like to animate your presentations, you are going to want to present the animated versions in your video conference. Here’s the reality: there’s a better than 50/50 chance that your animations will not play smoothly for your audience. Bandwidth is an issue right now (it may be for quite some time). Do yourself a favor: rebuild your presentations to use 40-point type and no more than three bullets per slide – that’s about what video conferencing software can handle. You can play videos through any video conferencing software, but your results will vary (greatly).
Bottom Line
Simple is best. One button beats lots of buttons. Natural light beats artificial light. If natural light is not an option, one light beats lots of lights. Wear a headset or earbuds to enhance your audio experience. Camera placement (webcam or external) is more important than camera quality. Use an external camera to up your game. Purchase a very good make-up brush and the appropriate color of pressed powder, and even out your skin tones before your video conference. Everyone (especially me: Mac Studio Fix NW35 in the summer, NW30 in the winter) looks better on video with a little pressed powder.
Author’s note: This is not a sponsored post. I am the author of this article and it expresses my own opinions. I am not, nor is my company, receiving compensation for it.